In this step-by-step guide, we will explore how to teach others to create their own survival kit with empathy and understanding. We will introduce the critical topic of building a survival kit and stress the importance of being prepared for emergencies. By following these steps, individuals can learn essential skills to protect themselves and their loved ones in challenging situations. Let’s embark on this journey of empowerment and preparedness together.
Top Picks for Preparedness and Resilience


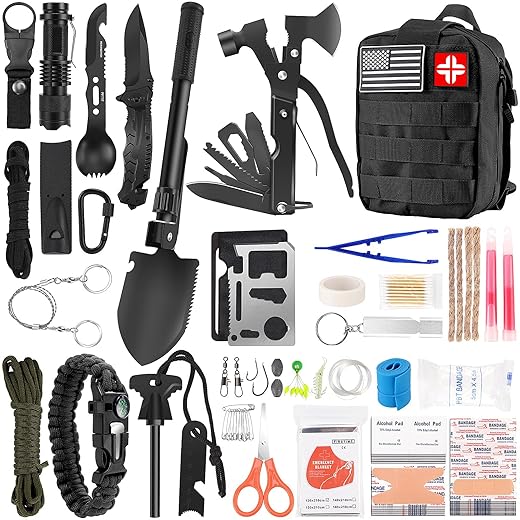
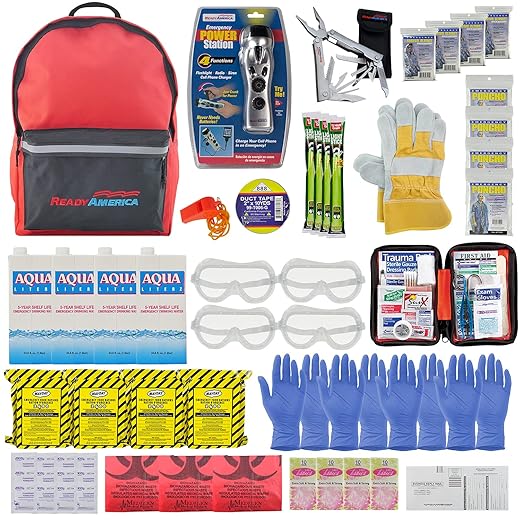
Gather Necessary Supplies
- Prepare your Essential Survival Kit:
- Food: Pack non-perishable items like energy bars, canned goods, and dried fruits that require no cooking.
- Water: Store at least one gallon of water per person per day and include a water purification method such as tablets or a filter.
- First Aid Supplies: Assemble a kit with bandages, antiseptic wipes, pain relievers, and any personal medications you may need.
- Tools: Include a multipurpose tool, flashlight, matches or a lighter, and a whistle for signaling.
- Shelter Materials: Bring along a lightweight emergency blanket, poncho, or tarp for protection from the elements.

Educate on Use of Tools
- Familiarize: Examine each tool in the survival kit closely.
- Understand: Identify the purpose of each tool.
- Practice: Try using each tool in a safe environment before relying on it in an emergency.
- Maintain: Keep all tools clean and sharp for optimal performance.
Demonstrate Food Preparation Techniques
- Foraging: Locate edible plants, berries, and roots in your surroundings. Identify safe and nutritious options, using field guides if available. Wash the foraged items thoroughly before consumption.
- Cooking: Build a fire using dry wood and tinder. Create a makeshift cooking surface using rocks or metal sheets. Cook food slowly over the fire, ensuring it is thoroughly cooked to kill any harmful bacteria.
- Preserving: Store any leftover food in airtight containers to prevent spoilage. Consider drying or smoking meat and fish to extend their shelf life. Utilize natural preservatives like salt or vinegar if available.
Teach First Aid Basics
- Clean Wounds: Rinse the wound under cool running water to remove dirt and debris. Avoid using soap or hydrogen peroxide, as these can irritate the wound. Pat the area dry with a clean cloth.
- Bandage Wounds: Apply an antibiotic ointment to the wound, then cover it with a sterile bandage or gauze pad. Secure the bandage with medical tape to keep it in place. Change the bandage daily and monitor for signs of infection.
- Perform CPR: Check for responsiveness and call emergency services before starting CPR. Place your hands in the center of the chest and push down firmly at a rate of 100-120 compressions per minute. Continue until help arrives or the person starts breathing.
- Treat Common Injuries: For minor burns, run cool water over the affected area for 10-15 minutes. For sprains, elevate the injured limb and apply ice wrapped in a cloth to reduce swelling. Always seek medical attention if the injury is severe or if you are unsure how to proceed.
Building Shelter
- Gather branches, leaves, and any available material to create a base for your shelter. Lay down the branches in a triangular shape to form the structure of the shelter.
- Weave smaller branches between the larger ones to create a sturdy framework. Use leaves or grass to cover the structure, providing insulation and protection from the elements.
- Utilize rocks or logs to anchor the base of the shelter and ensure it is stable. Experiment with different techniques such as lean-to, A-frame, or debris hut shelters to find the most suitable design for your environment.
Fire Starting Methods
- Flint and Steel Method: Strike the flint against the steel at a 45-degree angle, directing the sparks onto dry tinder. Repeat the striking motion until the tinder ignites.
- Friction Method (Bow Drill): Create a bow using a curved stick and a piece of cord. Attach a spindle to the cord and place it against a fireboard. Rotate the spindle back and forth by moving the bow, generating enough friction to create an ember. Transfer the ember to a tinder bundle and blow gently to create a flame.
- Solar Method: Find a clear plastic bag filled with water and use it to focus sunlight onto a tinder bundle. Position the bag to concentrate the light onto the tinder until it begins to smolder and eventually catch fire.
Water Sourcing and Purification
Water Sourcing and Purification Guide
- Finding Water:
- Locate: Search for water sources like rivers, lakes, or streams.
- Inspect: Check for clear running water and avoid stagnant pools.
- Collect: Gather water in a clean container, such as a bottle or pot.
- Purifying Water:
- Boil: Heat water until it reaches a rolling boil for at least one minute.
- Filter: Use a cloth or coffee filter to remove debris before boiling.
- Cool: Let the boiled water cool before drinking to avoid burns.
- Storing Clean Water:
- Container: Store purified water in a clean, airtight container.
- Location: Keep water in a cool, dark place away from direct sunlight.
- Rotation: Regularly check and replace stored water to ensure freshness.
Navigation Skills
- Learn how to read a map properly by identifying key landmarks such as mountains, rivers, and roads. Use these landmarks to orient yourself and determine your location accurately.
- Practice using a compass to find cardinal directions like north, south, east, and west. Hold the compass level and rotate the bezel until the needle aligns with the orienting arrow to get the right direction.
- Pay attention to natural signs like the sun’s position in the sky, wind direction, or patterns in vegetation to gauge your heading when navigating without tools. For instance, moss usually grows on the north side of trees in the northern hemisphere, indicating that south is in the opposite direction.
Practice and Prepare
- Practice Drills: Conduct regular practice drills using the items in your survival kit to simulate emergency situations. This will help you familiarize yourself with the tools and supplies in the kit and ensure quick and effective response during a real emergency.
- Preparation Exercises: Create scenarios that require you to use the items in the survival kit and practice how to handle each situation effectively. This hands-on approach will boost your confidence in using the tools when faced with an actual emergency.
- Review and Refine: After each practice session, review your performance and identify areas that need improvement. Refine your skills by repeating drills that challenge you and enhance your preparedness for any unforeseen circumstances.
Empowering Self-Reliance and Preparedness
In conclusion, teaching others to create their own survival kit is crucial for preparing individuals to be self-reliant during emergencies. The ability to craft a personalized survival kit not only ensures readiness but also empowers individuals to take control of their own safety and well-being. By imparting these skills, we promote resilience and preparedness in the face of unforeseen challenges, fostering a community of individuals who can confidently navigate critical situations.
Essential supplies checklist


Expert Survival Kit Advice
Instructions for Assembling and Utilizing Your Survival Kit
- Familiarize yourself with the contents of the survival kit: Take some time to understand what items are included in your survival kit and how to use them effectively
- Carry the survival kit with you at all times: Whether you’re hiking, camping, or traveling, make sure to have your survival kit within reach to provide assistance in case of emergencies
- Regularly check and replenish supplies: It’s important to periodically inspect the contents of your survival kit to ensure everything is in working order and restock any items that may have been used or expired
- Practice using the tools in the survival kit: Prior to needing them in a real emergency situation, practice using the tools included in the survival kit so you are familiar with how they work
- Seek out additional training or resources: Consider taking a first aid or survival skills course to further prepare yourself for potential emergencies and how to make the best use of your survival kit
Survival Kit FAQs
A personal survival kit is designed to provide essential items for one individual to survive in emergency situations. It typically includes items such as water purification tablets, first aid supplies, food rations, a flashlight, and a multi-tool.
On the other hand, a family or group survival kit is meant to support multiple people during emergencies. It includes larger quantities of items such as food, water, and supplies to accommodate the needs of several individuals. Additionally, a family/group survival kit may contain items for shelter building, communication tools, and additional medical supplies compared to a personal survival kit.
Some alternative items that are often overlooked in survival kits include duct tape (for repairs and first aid), a multi-tool (for various tasks), a small sewing kit (for repairs), extra cash (for emergencies), and a deck of playing cards (for entertainment and stress relief).
A typical survival kit should be able to sustain you for at least 72 hours. This includes providing you with essential supplies such as food, water, shelter, first aid, and other necessary items to help you survive for a minimum of three days in case of an emergency situation.
There are various resources and guides available for building a comprehensive and effective survival kit. Some options include survival experts’ books, online articles from reputable sources, survivalist websites, and even YouTube channels dedicated to survival skills. Additionally, organizations like the Red Cross and FEMA offer guides and information on emergency preparedness and building survival kits. It’s important to research multiple sources and tailor your survival kit to your specific needs and environment.
It is recommended to check and update your survival kit at least twice a year. Additionally, you should also inspect your kit before any outdoor adventure or significant change in season to ensure that all items are in good condition and up-to-date.
Including real-life examples would make this guide even more practical for readers.
I enjoyed reading this article and feel more prepared to teach others about survival kit essentials. Thank you!
I found the tips on prioritizing essential items very helpful. It’s important to focus on what’s truly necessary.
Great article! I appreciate the detailed steps on creating a survival kit.
It would be beneficial to address different scenarios or environments when creating a survival kit.